Wednesday, April 15, 2015

Apche Camel : First Step Towards

Here, I'm going to explain basic things of Apache Camel which is an open source project from Apache Foundation. At the end we will see the simple example which demonstrate the FileComponent of Apche Camel.

To go further I assumed that you have enough knowledge of EIP(Enterprise Integration Patterns), MEP(Message Exchange Patterns), DSL(Domain Specific  Languages), ESB, etc. It is advised to have basic information of above mentioned terms before you read further.

Now a days data becoming crucial things in the Cyber World among all the companies. To exchange the data between them is more crucial as each company has their own system to handle this data. It is important to have technology which fills this gap in such a way that exchange of data among companies accurately, efficiently, speedily, reliably, securely and off course easily. There are many open source solutions available to fill this gap. But I found Apache Camel is most preferable open source solution for integrating different systems to exchange the data in a different format. I became a camel lover since when I started using it and off-course because it is written in Java.

Now, I think this is enough for you about why Apache Camel is useful. Let's start with the Apache Camel architecture.


Now let's see the key concept or components which make Apache Camel a powerful integration and routing framework among all the available in the same category.
  • Camel Context: Camel Context is the heart of the Camel Framework. It's runtime environment where different entity communicate with each other. For more you can see the lifecyle of CamelContext in detail
  • Camel Endpoints: Camel Endpoints are nothing but the Message Endpoints which is based on EIP by using Endpoint interface. Camle can receive messages from Endpoints or send messages to the Endpoints. You can read more on EIP by visiting this http://www.enterpriseintegrationpatterns.com
  • Camel Processors: Processors are the again key entity in camel which is associated with processing of incoming messages from Endpoints. For more you can visit http://camel.apache.org/processor.html
  • Camel Components: Camel Components defined the Endpoint in message lifecyle in camel. There are more than 80 components available in the camel. You can refer them on official camel website. http://camel.apache.org/components.html
  • Camel Route: Camel Route are the flow of the message. How it process in camel. It has two endpoints associated with it and respectively Camel component as well. Camel route also having the filter, interceptor, validator, converter which defined the flow of the message. We can create a route via DSL. There are different DSL available which defined the route of the message. Most commonly used are Spring DSL, Java DSL. You can read more on that by your own as it's a very huge topic and we are not going elaborate them over here.

Now, I'm winding up theoretical part as you can read whenever you want from the net. I knew that you are quite interested in the programming. :D :D :D

So, Let's begin that. First you need to download the Apache Camel from the official site. You can download form here.

I will be surprised if you don't have java installed on your machine and you are not using any of the popular IDE for doing programming. If you do not have java than please make java available on your machine.

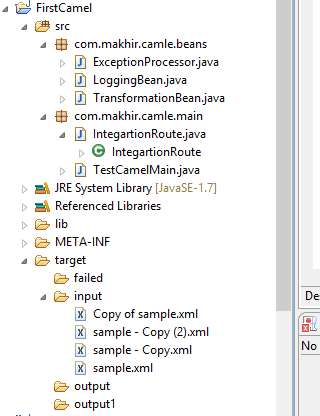
Now, create on java project. Here, I've used Eclipse IDE for my stuffs. Below is the directory structure.


Add the required jar in the lib folder of your project from the downloaded Apache Camel zip file after extraction on you local drive. Add then into classpath too of your project.

As you can see that I've created two two package in my project. One for having all the beans and one having launcher class and route builder class. I've also created one folder with name target in the same project and respectively added there more folder with name input, output, failed folder.

Here, I've used FileComponent of the Camel for file processing. I've created one class with name TestCamelMain.java which act as a launcher of the Camel. Below is the code snippet of the same class.

TestCamelMain.java
------------------------------
public class TestCamelMain {
public static void main(String[] args) {
System.out.println("Enter: TestCamelMain.main");
CamelContext context = null;
try {
context = new DefaultCamelContext();
context.addRoutes(new IntegartionRoute());
context.start();
//Indefinitely wait
Object obj = new Object();
synchronized (obj) {
obj.wait();
}
//Thread.sleep(10000);
} catch (Exception e) {
System.out.println("Error: " + e.getMessage());
e.printStackTrace();
try {
context.stop();
} catch (Exception e1) {
e1.printStackTrace();
}
}
System.out.println("Exit: TestCamelMain.main");
}
}
-----------------------
Now we are going to create the route builder class which defined the flow of the incoming message. Here, I've created the class with name IntegartionRoute.java which extends RouteBuilder class. The code snippet as per below,

IntegartionRoute.java
------------------------
public class IntegartionRoute extends RouteBuilder{

@Override
public void configure() throws Exception {
System.out.println("Enter: IntegartionRoute.configure");
/**
* If we wanted to handle the any kind of exception occurred during the processing
* than we have to add the exception block first. This will capture the exception route the
* message to specified endpoint
* */
onException(Exception.class)
.maximumRedeliveries(0)
.process(new ExceptionProcessor())
.to("file:target/failed");
from("file:target/input")
.choice() //Here we can give the choice to the incoming document
.when(xpath("/order/product = 'gadget'"))
.process(new LoggingBean())
.bean(new TransformationBean(), "makeItUpperCase")
.to("file:target/output")
.otherwise()
.to("file:target/output1");
System.out.println("Exit: IntegartionRoute.configure");
}
}
------------------------------
In the above class I've defined the route of my incoming message. As I've stated that I've used FileComponent for receiving the file from target/input folder and after processing move to target/output folder by checking file content and by making file content to upercase.

Here, I've also handled the exception whenever occurred during the file processing in different component. In this case I've added one business logic to check the the file content whether it content contains the specific information or not by using xPath which is again Camel's component. If it do not contains the required information than we will send that file to target/output1 directory. If it contains than we will send it to the target/output directory. In between any error occurred than we will send that file to target/failed directory. Here, I've used Java DSL for defining the route.

I've considered the incoming file to be xml file. Below are the ExceptionProcessor,  LoggingBean, TransformationBean which are used at different stages.

ExceptionProcessor.java
------------------------------
public class ExceptionProcessor implements Processor{

@Override
public void process(Exchange exchange) throws Exception {
System.out.println("Enter: ExceptionProcessor.process");
Exception exception = (Exception) exchange.getProperty(Exchange.EXCEPTION_CAUGHT);
System.out.println("Error: " + exception.getMessage());
exception.printStackTrace();
System.out.println("Exit: ExceptionProcessor.process");
}
}
------------------------
LoggingBean.java
------------------------
public class LoggingBean implements Processor{

@Override
public void process(Exchange exchange) throws Exception {
System.out.println("Enter: LoggingBean.process");
System.out.println("Received Message Id: " + exchange.getIn().getMessageId());
System.out.println("Captured Data: " + exchange.getIn().getBody(String.class));
System.out.println("Exit: LoggingBean.process");
}
}
----------------------------
TransformationBean.java
----------------------------
public class TransformationBean {
public String makeItUpperCase(String body) {
System.out.println("Enter: TransformationBean.makeItUpperCase");
String transformedBody = body.toUpperCase();
System.out.println("TransformedBody : " + transformedBody);
System.out.println("Exit: TransformationBean.makeItUpperCase");
return transformedBody;

}
}
---------------------
Below are the xml file which I've used in processing,
---------------
sample.xml
---------------
<xml version="1.0" encoding="UTF-8"> 
 <order>
 <product>gadget</product>
 <lineitems>
  <item>cdplayer</item>
  <qty>2</qty>
 </lineitems>
 <lineitems>
  <item>ipod-nano</item>
  <qty>1</qty>
 </lineitems>
</order>

Congrats to you. You have learnt first lesson of Apache Camel.
Now by running TestCamelMain.class you can see the Camel is started. Now, for a magic you should  put one file in target/input folder and check the respective folder and also see the console for the flow.

That's it. After reading this don't forgot to give your valuable feedback on the same. Your feedback might be useful to other and also encourage me to keep posting.

Will come soon with other topic of Apache Camel.

(Reference: Apache Camel and DZone)

Cheers,
Ashish Mishra

Wednesday, September 24, 2014

HTML Parsing and Querying with JSoup

Now a days in web environment we have too much work with HTML pages.

If you have any requirement like parsing, querying or adding missing tags in html document than from my point of view JSoup is the answer for it.

Here, I am going to show some little work around HTML document with the help of JSoup utility.

Please download JSoup jar file from JSoup download page and add this into your projects lib directory.

Below is the code snippet for above discussion,

HTML File :

<!DOCTYPE html>
<body bgcolor="#FFFFFF" text="#000000">
    <div align="center"  id="mainDiv"><font size="6">Welcome to JSoup Test Demo</font> 
    </div>
    <form name="testForm" method="post" action="controller_context_path">
        <table width="90%" border="0" cellspacing="4" cellpadding="4">
            <tr>
                <td width="50%">
                    <div align="right">
                        User Id:
                    </div>
                </td>
                <td width="50%">
                    <div align="left">
                        <input type="text" name="userId" value="">
                    </div>
                </td>
            </tr>
            <tr>
                <td width="50%">
                    <div align="right"  id="div1">
                        Name:
                    </div>
                </td>
                <td width="50%">
                    <div align="left" id="div2">
                        <input type="text" name="orgId" value="">
                    </div>
                </td>
            </tr>
            <tr>
                <td width="50%">
                    <div align="right"></div>
                </td>
                <td width="50%">
                    <div align="left"  id="div3">
                        <input type="submit" name="Submit" value="Login">
                    </div>
                </td>
            </tr>
        </table>
        <p>&nbsp;</p>
    </form>
</body>
</html>
-----------------------------------------------------------
Java Code:
Below is the code snippet to parse above document and querying to specific tag in HTML page,

File htmlFile =  new File("HTML file path");
org.jsoup.nodes.Document document = Jsoup.parse(xslfile, "UTF-8");

This will create html document with all the tags. This will format whole html file if it broken or some tags which is not ended with their respective tag,
Now if we want body section of the html page than
Element body = document.body();
If we want to convert body element into string format than simply use body.toString() method of Element.

For traversing or querying across html document below is the code snippet.

Elements element = document.select("div.div1"); //tagName.id of the tag

This will returns all the div tags which have id div1 in html document.

Now querying exact document from the html document below is the code snippet,

Element element = document.select("div.div3").select("input[name$=Submit]").first(); 

This will returns the element of input type whose attribute name contains Submit text.

For in-depth querying pattern visit http://jsoup.org/cookbook/extracting-data/selector-syntax

This is things which i have mentioned here. You can visit http://jsoup.org for more information.

Here is the comparison of different HTML parser which will be useful in selecting the html parser which are currently available. Visit http://en.wikipedia.org/wiki/Comparison_of_HTML_parsers

This might be helpful to you guys to initiate work related html document.

Please don't forgot to add your comment or feedback if you like this post or useful in any ways.

Cheers,
Ashish Mishra

Saturday, August 2, 2014

Mostly asked HR interview questions with points

Here i have listed few key HR round interview questions with bullet point which are mostly asked. These questions are based on my personal experience. I think i should share this information with you and might be helpful to you when you are going to face HR round. Here i have listed only bullet points and not described in details.

Que 1: What is your strength?
Points to remember
Adaptability : Adjustable in any kind of environment situation to work
Hard Working : Very hard working towards work
Honest :
Flexibility : Can work any where and any place in any environment
Optimistic : Positive Attitude
Fast Decision Making : Fast decision making(Good decision) in any kind of situation and pressure
Persistence : Regular in work, work with dedication
Self Motivated : I am self motivated person

Example: I am honest, self motivated and hard working guy with positive attitude towards my carrer and life

Que 2: What is weakness?
Points to remember:
Straightforward : Strait forward attitude
Impatient : Impatient in work.
Sensitive
More Talkative
Trust people very quickly
I can't say no when someone ask for help
Take decisions very quickly
Get nervous when talk to stranger
To speak lie is difficult for me
I am bit lazy about which i am not interested

Example: I can't say no when someone ask for help and little bit lazy about which i am not interested
Note: Include only two-three points in weakness when facing real interview


Que 3: Why should i hire you?
Points to remember:
Share your knowledge
Work Experience
Skills Related to job
Career Goal

Example: With reference to my work experience, i satisfy all the requirement for this job. I am sincere with my work and would never let you down anyway. I promise you will never regret for the decision to appoint me in your organization.

Que 4: Tell me what you know about this company.
Points to remember:
Pre-study about the company in details
Do the background work about ongoing/upcoming projects
Know the names of owners and partners
Research about the current issues
Update your knowledge about their competitors

Example: It's one of the best growing company in India. The work environment of the company is very good. People feel proud to be part of the company as company provides full supports to their employees in professional front it has many branches across the world so i have good opportunity to show my talent.

Que 5: Why are looking for job change?
Points to remember
Thanks to previous organization
What you learn in your previous organization
Share your reason for job change
Relates to career goals

Example: I am thankful to my previous organization because i have learnt lot of things there. According to me changes are necessary for everyone to enhance skills, knowledge and for personal growth and financial growth. Your organization is the good platform where i can learn more.

Que 6: What are your salary requirements?
Points to remember
Should share their expected salary
Always say as per the company norms for the job

Example: I have 4 years of experience in IT. My current CTC is XXX Lac/yr salary has never been a big issue for me. Still i am expecting salary as company's norms as per my designation and my qualification and experience which can help me to maintain my standard of level of my personal and economical needs.

Que 7: What are your career goals?
Points to remember
Short term goal
Long term goal

Example: My short term goal is to get a job in reputed company where i can utilize my skills and improve my career path. My long term goal is to be in respectable position in that organization.


Que 8: Do you any questions to ask me?
Points to remember
Express thanks
Salary Structures
Job timings
Job Location
Overtime allowance
Training Period
Probation Period
Transport Facility

Example: Thank you for giving this opportunity. Sir I would like to know about the job timings and transport facility and what will be the job location and salary structure for this job?

Hope this will help you to crack HR round of interview. If you have any suggestion or feedback which help us than please share your opinion and feedback so i can add in the same.

Cheers,
Ashish Mishra

Wednesday, January 29, 2014

DOM4J: Remove duplicate xml elements from xml

Today i will explain about handling duplicate xml elements of xml.

I think you are little bit aware with DOM4J API from Apache Foundation.

DOM4J API basically is for playing with XML. Sometime your facing the issue that how to get distinct element list from the given xml. To achive this we iterate whole document and get required list. But same thing can be achive by given DOM4J API.

You need to have a latest copy of dom4j.jar. You can easily download it from Sourceforge

Here i will show you the practical example of the same.

//XML Document
<?xml version="1.0" encoding="UTF-8"?>
<document>
<element>
<id>1</id>
</element>
<element>
<id>1</id>
</element>
<element>
<id>2</id>
</element>
<element>
<id>3</id>
</element>
<element>
<id>2</id>
</element>
<element>
<id>6</id>
</element>
<element>
<id>5</id>
</element>
<element>
<id>3</id>
</element>
<element>
<id>4</id>
</element>
<element>
<id>4</id>
</element>
</document>

Now create one class file and add below code snippet in your class
String xmlDoc = ""; //Add code which reads the xml input file from your file location

//Creating org.dom4j.Document objet from xml content
Document document = DocumentHelper.parseText(xmlDoc);

//Now creating distinct list from the created xml ducument with below code snippet

List<Node> nodes = document.selectNodes("//document/element", "id", true);

/*
* XPath for distinct element : "//document/element"
* Element name on which nodes will be compare: "id"
* Boolean flag which indicates to remove duplicate nodes or not.
**/

Friday, March 22, 2013

XSLT Transformation: Full Swing Application


Hi to All,

I have lots of work with xslt and XML.
I frequently required xml transformation with xsl file. There haven't any xslt transformation tool with me as a open source.
So i came with basic xslt transformation application with java swing.

Through this application you can transform with the help of xslt.
You can also format your xml in well-formed xml with this application.

Create one class with the help of below sample code your transformer is ready to work. When you run this class then main screen is launched as i have attached screen shot.

You simple select your xslt file and xml file from appropriate button on the main screen. For transformation of xml file is performed by clicking on Transform button.

Once you click on Transform button, than resultant xml file will be printed on blank area of the screen. If any error occurred in transformation than error message will be printed in red color.

If you want to format you xml file, than simply copy your xml file content.
Once you done than clicked on the Format XML button than well-formed xml is being printed on text area.

Below is the full sample code.
-------------------
XSLTransformation.java
-------------------

package com.makhir.main;

import java.awt.Color;
import java.awt.Dimension;
import java.awt.Font;
import java.awt.Toolkit;
import java.awt.event.ActionEvent;
import java.awt.event.ActionListener;
import java.awt.event.ComponentAdapter;
import java.awt.event.ComponentEvent;
import java.io.ByteArrayOutputStream;
import java.io.File;
import java.io.PrintWriter;
import java.io.StringReader;
import java.io.StringWriter;

import javax.swing.JButton;
import javax.swing.JFileChooser;
import javax.swing.JFrame;
import javax.swing.JLabel;
import javax.swing.JLayeredPane;
import javax.swing.JOptionPane;
import javax.swing.JPanel;
import javax.swing.JScrollPane;
import javax.swing.JTextArea;
import javax.swing.border.BevelBorder;
import javax.swing.border.CompoundBorder;
import javax.swing.border.TitledBorder;
import javax.xml.parsers.DocumentBuilderFactory;
import javax.xml.transform.Result;
import javax.xml.transform.Source;
import javax.xml.transform.Transformer;
import javax.xml.transform.TransformerException;
import javax.xml.transform.TransformerFactory;
import javax.xml.transform.stream.StreamResult;
import javax.xml.transform.stream.StreamSource;

import org.w3c.dom.Node;
import org.w3c.dom.bootstrap.DOMImplementationRegistry;
import org.w3c.dom.ls.DOMImplementationLS;
import org.w3c.dom.ls.LSOutput;
import org.w3c.dom.ls.LSSerializer;
import org.xml.sax.InputSource;

public class XSLTransformation implements ActionListener {
private static JFrame mainScreen;
private static JPanel mainPanel;
private static JLayeredPane insertLayPan, resultLayPan, operationLayPan;
private static JLabel xmlFileLabel, xslFileLabel;
private static JFileChooser fileChooser;
private static File xslFile, xmlFile;
private static JButton xmlFileSelector, xslFileSelector, transformButton, saveButton, clearButton, formatButton;
private static JTextArea textArea;
private static JScrollPane scrollPane;

static {
initComponents();
}

/**
* Inits the components.
*/
private static void initComponents() {
mainScreen = new JFrame("m@kh!r: XSLT Transformer");
mainPanel = new JPanel();
resultLayPan = new JLayeredPane();
insertLayPan = new JLayeredPane();
xmlFileLabel = new JLabel();
xslFileLabel = new JLabel();
operationLayPan = new JLayeredPane();
// Initializing the file chooser component 
fileChooser = new JFileChooser();
fileChooser.setMultiSelectionEnabled(true);
/* Setting Current Directory */
fileChooser.setCurrentDirectory(new File("."));
fileChooser.setFileFilter(new javax.swing.filechooser.FileFilter() {
public boolean accept(File f) {
return f.getName().toLowerCase().endsWith(".xml") || f.getName().toLowerCase().endsWith(".xsl") || f.isDirectory();
}
@Override
public String getDescription() {
return "XML or XSL File";
}
});
xmlFileSelector = new JButton();
xslFileSelector = new JButton();
transformButton = new JButton();
saveButton = new JButton();
xmlFile = null;
xslFile = null;
textArea = new JTextArea();
scrollPane = new JScrollPane();
clearButton = new JButton();
formatButton = new JButton();
}

public void createGUI() {
// Main Screen height-width
mainScreen.setSize(845, 630);

// Main Panel height-width
mainPanel.setBorder(new BevelBorder(BevelBorder.RAISED, Color.gray, Color.pink, Color.white, Color.white));
mainPanel.setLayout(null);
mainPanel.setSize(mainScreen.getSize().width - ScreenSizeConstants.mainPanelWidthDiff, mainScreen.getSize().height - ScreenSizeConstants.mainPanelHeightDiff);

// ---- xmlFileLabel ----
xmlFileLabel.setText("XML File");
xmlFileLabel.setFont(new Font("Tahoma", Font.PLAIN, 12));
insertLayPan.add(xmlFileLabel, JLayeredPane.DEFAULT_LAYER);
xmlFileLabel.setBounds(15, 25, 125, xmlFileLabel.getPreferredSize().height);

// ---- xslFileLabel ----
xslFileLabel.setText("XSL File");
xslFileLabel.setFont(new Font("Tahoma", Font.PLAIN, 12));
insertLayPan.add(xslFileLabel, JLayeredPane.DEFAULT_LAYER);
xslFileLabel.setBounds(15, 78, 125, 14);

// ---- xmlFileSelector button ----
xmlFileSelector.setText("Select XML File");
xmlFileSelector.setFont(new Font("Tahoma", Font.BOLD, 12));
xmlFileSelector.setToolTipText("Click here to select the xml file from your directory");
insertLayPan.add(xmlFileSelector, JLayeredPane.DEFAULT_LAYER);
xmlFileSelector.setBounds(18, 48, 160, 25);
xmlFileSelector.addActionListener(this);

// ---- xslFileSelector button ----
xslFileSelector.setText("Select XSL File");
xslFileSelector.setFont(new Font("Tahoma", Font.BOLD, 12));
xslFileSelector.setToolTipText("Click here to select the xsl file from your directory");
insertLayPan.add(xslFileSelector, JLayeredPane.DEFAULT_LAYER);
xslFileSelector.setBounds(18, 100, 160, 26);
xslFileSelector.addActionListener(this);

// ---- File Selection layered panel
insertLayPan.setBorder(new TitledBorder(null, "File Selection",
TitledBorder.LEADING, TitledBorder.DEFAULT_POSITION, new Font("Tahoma", Font.BOLD, 12), Color.blue));
insertLayPan.setBounds(10, 8, 200, 150);
mainPanel.add(insertLayPan);

// ---- Transformation button ----
transformButton.setText("Transform");
transformButton.setFont(new Font("Tahoma", Font.BOLD, 12));
transformButton.setToolTipText("Click here to transform the xml through xsl");
operationLayPan.add(transformButton, JLayeredPane.DEFAULT_LAYER);
transformButton.setBounds(18, 30, 160, 25);
transformButton.addActionListener(this);

// ---- Save button ----
saveButton.setText("Save");
saveButton.setFont(new Font("Tahoma", Font.BOLD, 12));
saveButton.setToolTipText("Click here to save the xml");
operationLayPan.add(saveButton, JLayeredPane.DEFAULT_LAYER);
saveButton.setBounds(18, 65, 160, 25);
saveButton.addActionListener(this);

// ---- Format button ----
formatButton.setText("Format XML");
formatButton.setFont(new Font("Tahoma", Font.BOLD, 12));
formatButton.setToolTipText("Click here to format xml");
operationLayPan.add(formatButton, JLayeredPane.DEFAULT_LAYER);
formatButton.setBounds(18, 100, 160, 25);
formatButton.addActionListener(this);
// ---- Clear button ----
clearButton.setText("Clear");
clearButton.setFont(new Font("Tahoma", Font.BOLD, 12));
clearButton.setToolTipText("Click here to clear result area");
operationLayPan.add(clearButton, JLayeredPane.DEFAULT_LAYER);
clearButton.setBounds(18, 138, 160, 25);
clearButton.addActionListener(this);

// ---- Operations layered panel
operationLayPan.setBorder(new TitledBorder(null, "Operation", TitledBorder.LEADING, TitledBorder.DEFAULT_POSITION, new Font("Tahoma", Font.BOLD, 12), Color.blue));
operationLayPan.setBounds(10, 158, 200, 190);
mainPanel.add(operationLayPan);

// Setting height and width of component
resultLayPan.setBounds(220, 8, mainPanel.getSize().width - ScreenSizeConstants.resultLayPanWidthDiff, mainPanel.getSize().height - ScreenSizeConstants.resultLayPanHeightDiff);
scrollPane.setBounds(20, 25, resultLayPan.getSize().width - ScreenSizeConstants.scrollPaneWidthDiff, resultLayPan.getSize().height - ScreenSizeConstants.scrollPaneHeightDiff);
textArea.setBounds(5, 5, scrollPane.getSize().width - ScreenSizeConstants.textAreaWidthDiff, scrollPane.getSize().height - ScreenSizeConstants.textAreaHeightDiff);

// ----- textArea ------
textArea.setText("");
//textArea.setBounds(5, 5, 520, 520);
textArea.setFont(new Font("Tahoma", Font.PLAIN, 12));
textArea.setLineWrap(true);

scrollPane.setVerticalScrollBarPolicy(JScrollPane.VERTICAL_SCROLLBAR_ALWAYS);
scrollPane.add(textArea);
//scrollPane.setBounds(20, 25, 560, 540);
scrollPane.setAutoscrolls(true);
scrollPane.setViewportView(textArea);
resultLayPan.add(scrollPane, JLayeredPane.DEFAULT_LAYER);

// Display result panel
resultLayPan.setBorder(new CompoundBorder(new TitledBorder(null, "Transformation Result", TitledBorder.LEADING, TitledBorder.DEFAULT_POSITION, new Font("Tahoma", Font.BOLD, 12), Color.blue), null));
//resultLayPan.setBounds(220, 8, 600, 582);
mainPanel.add(resultLayPan);

Toolkit tk = Toolkit.getDefaultToolkit();
   Dimension screenSize = tk.getScreenSize();
   int screenHeight = screenSize.height;
   int screenWidth = screenSize.width;
   mainScreen.setLocation(screenWidth / 4, screenHeight / 4 - 200);
   mainScreen.setDefaultCloseOperation(JFrame.EXIT_ON_CLOSE);
mainScreen.setVisible(true);
mainScreen.getContentPane().add(mainPanel);

final int initialWidth = mainScreen.getSize().width;
final int initialHeight = mainScreen.getSize().height;
mainScreen.addComponentListener(new ComponentAdapter() {
 public void componentResized(ComponentEvent event) {
 int width = Math.max(initialWidth, mainScreen.getWidth());
 int height = Math.max(initialHeight, mainScreen.getHeight());
 mainPanel.setSize(width - ScreenSizeConstants.mainPanelWidthDiff, height - ScreenSizeConstants.mainPanelHeightDiff);
 resultLayPan.setSize(mainPanel.getSize().width - ScreenSizeConstants.resultLayPanWidthDiff, mainPanel.getSize().height - ScreenSizeConstants.resultLayPanHeightDiff);
 scrollPane.setSize(resultLayPan.getSize().width - ScreenSizeConstants.scrollPaneWidthDiff, resultLayPan.getSize().height - ScreenSizeConstants.scrollPaneHeightDiff);
 textArea.setSize(scrollPane.getSize().width - ScreenSizeConstants.textAreaWidthDiff, scrollPane.getSize().height - ScreenSizeConstants.textAreaHeightDiff);
 }
});
}

public void actionPerformed(ActionEvent event){
String command = event.getActionCommand();
String message = "";
int result = -1;
textArea.setForeground(Color.BLACK); // Setting default color
textArea.setFont(new Font("Tahoma", Font.PLAIN, 12)); // Setting default format
if(command.equalsIgnoreCase("Select XML File")){
result = fileChooser.showOpenDialog(new JFrame());
} else if(command.equalsIgnoreCase("Select XSL File")){
result = fileChooser.showOpenDialog(new JFrame());
} else if(command.equalsIgnoreCase("Transform")){
if(xmlFile != null && xslFile != null){
try {
//message = transform(xmlFile, xslFile);
transform(xmlFile, xslFile);
//textArea.setText(message);
} catch (Exception e) {
textArea.setFont(new Font("Tahoma", Font.BOLD, 12));
textArea.setForeground(Color.RED);
textArea.setText(e.getLocalizedMessage());
}
} else {
if(xmlFile == null)
JOptionPane.showMessageDialog(null, "Please, select xml file for transformation");
else if(xslFile == null)
JOptionPane.showMessageDialog(null, "Please, select xsl file for transformation");
else
JOptionPane.showMessageDialog(null, "Please, provide some valuable input");
}
} else if(command.equalsIgnoreCase("Save")){
JOptionPane.showMessageDialog(null, "Yet not implemented..!!");
} else if(command.equalsIgnoreCase("Clear")){
textArea.setText("");
} else if(command.equalsIgnoreCase("Format XML")){
try {
if(textArea.getText().length() > 0)
textArea.setText(formatXML(textArea.getText()));
} catch (Exception e) {
textArea.setFont(new Font("Tahoma", Font.BOLD, 12)); // "Tahoma", Font.BOLD, 12, Color.red
textArea.setForeground(Color.RED);
textArea.setText(e.getLocalizedMessage());
}
} else {
JOptionPane.showMessageDialog(null, "What is this?");
}

if(result == JFileChooser.APPROVE_OPTION){
File tempFile = fileChooser.getSelectedFile();
if(tempFile != null && tempFile.getName().toLowerCase().endsWith(".xml"))
xmlFile = tempFile;
else if(tempFile != null && tempFile.getName().toLowerCase().endsWith(".xsl"))
xslFile = tempFile;
else
JOptionPane.showMessageDialog(null, "Selected file " + fileChooser.getSelectedFile().getName() + " may not useful for xsl transformation.");
} else if(result == JFileChooser.CANCEL_OPTION){
JOptionPane.showMessageDialog(null, "You haven't select any file for transformation");
}
}
/**
* Transform the xml with use of xslt
* */
public void transform(File xmlFile, File xslFile){
try {
TransformerFactory factory = TransformerFactory.newInstance();
       Source xslt = new StreamSource(xslFile);
       Transformer transformer = factory.newTransformer(xslt);
       Source inputXML = new StreamSource(xmlFile);
       StringWriter writer = new StringWriter();
       Result result = new StreamResult(writer);
       if(xmlFile.exists() && xslFile.exists()){
        StreamResult output = new StreamResult(writer);
       transformer.transform(inputXML, output);
       textArea.setText(formatXML(writer.toString()));;
       } else 
        throw new Exception("XML or XSL File not found.");
       
} catch (TransformerException e) {
e.printStackTrace();
StringWriter writer = new StringWriter();
e.printStackTrace(new PrintWriter(writer));
textArea.setFont(new Font("Tahoma", Font.PLAIN, 10));
textArea.setForeground(Color.RED);
textArea.setText(writer.toString());
//throw e;
}catch (Exception e) {
//e.printStackTrace();
StringWriter writer = new StringWriter();
e.printStackTrace(new PrintWriter(writer));
textArea.setFont(new Font("Tahoma", Font.BOLD, 12));
textArea.setForeground(Color.BLACK);
textArea.setText(writer.toString());
}
}
/**
* This method format the xml with tagging and newline
* */
public String formatXML(String xml) throws Exception{
try {
        InputSource src = new InputSource(new StringReader(xml));
            Node document = DocumentBuilderFactory.newInstance().newDocumentBuilder().parse(src).getDocumentElement();
            boolean keepDeclaration = xml.startsWith("<?xml");
            DOMImplementationRegistry registry = DOMImplementationRegistry.newInstance();
            DOMImplementationLS impl = (DOMImplementationLS) registry.getDOMImplementation("LS");
            LSSerializer writer = impl.createLSSerializer();
            writer.getDomConfig().setParameter("format-pretty-print", true); // Set this to true if the output needs to be beautified.
            writer.getDomConfig().setParameter("xml-declaration", keepDeclaration); // Set this to true if the declaration is needed to be outputted.
            LSOutput output = impl.createLSOutput();
            output.setEncoding("UTF-8");
            ByteArrayOutputStream stream = new ByteArrayOutputStream();
            output.setByteStream(stream);
            writer.write(document, output);
            return new String(stream.toByteArray(), "UTF-8");
        } catch (Exception e) {
            throw e;
        }
    }
/**
* @param args the arguments
*/
public static void main(String[] args) {
try {
new XSLTransformation().createGUI();
} catch (Exception e) {
e.printStackTrace();
}
}
}
-------------------------
Thats it.

Below is some screen snippet of this application.


Thursday, March 21, 2013

Android: Downloading a file from Server and save it into SD card with progress bar


Android: Downloading a file from Server and save it into SD card with progress bar


Hi to all,
Now i am  going to explain here about how to download file from remote server and save it in SD card.
For this tutorial i assumed that you might have good in Android application development with popular IDE Eclipse.
So lets start to see how this happen in Android.

First of all you need to create a demo application in eclipse.
For me i have created Android Demo.
Create an class which is you launching point of your application.

Here, i called it MainActivity.java which extends the Activity.
Now, before we go in detail we need to give some permission to our
application on mobile device operating system so it can utilize the mobile features.

For internet connectivity we need to add below entry in our AndroidManifest.xml

<uses-permission android:name="android.permission.INTERNET"/>

This permission is enough to access the internet by our application.

Now we need to give permission for reading and writing to our application.
These can be achieved by adding below permission in AndroidManifest.xml,

<uses-permission android:name="android.permission.WRITE_EXTERNAL_STORAGE"/>
<uses-permission android:name="android.permission.READ_EXTERNAL_STORAGE"/>
<uses-permission android:name="android.permission.WRITE_SETTINGS" />

Now our application has full rights to read/write and access to internet.

After this configuration we need to jump in our designing part.
Here, i have used only one button download. On clicking on the download button it
simply make a remote server request to download a file.

Below is my code snippet for the screen design xml,

<menu xmlns:android="http://schemas.android.com/apk/res/android" >
<Button
        android:id="@+id/buttonDownload"
        android:text="@string/buttonDonwload"
        android:layout_width="wrap_content"
        android:layout_height="wrap_content"
        android:layout_centerHorizontal="true"
        android:layout_centerVertical="true"
        android:title="@string/buttonDonwload"/>
</menu>

After all these stuffes, now we need to code to make this apps running.
Below is the full code for which you are looking for.

---------------------------------
MainActivity.java
---------------------------------
package com.makhir.android.demo;

import java.io.ByteArrayInputStream;
import java.io.File;
import java.io.FileOutputStream;
import java.io.InputStream;

import org.apache.http.client.HttpClient;
import org.apache.http.client.ResponseHandler;
import org.apache.http.client.methods.HttpPost;
import org.apache.http.impl.client.BasicResponseHandler;
import org.apache.http.impl.client.DefaultHttpClient;
import org.apache.http.params.BasicHttpParams;
import org.apache.http.params.HttpConnectionParams;
import org.apache.http.params.HttpParams;

import android.app.Activity;
import android.app.Dialog;
import android.app.ProgressDialog;
import android.os.AsyncTask;
import android.os.Bundle;
import android.os.Environment;
import android.util.Log;
import android.view.Menu;
import android.view.View;
import android.widget.Button;
import android.widget.Toast;

public class MainActivity extends Activity {
private Button button;
ProgressDialog progDialog;
    int typeBar = 0;                 // Determines type progress bar: 0 = spinner, 1 = horizontal
    int delay = 40;                  // Milliseconds of delay in the update loop
    int maxBarValue = 200;           // Maximum value of horizontal progress bar
    public static final int DIALOG_DOWNLOAD_PROGRESS = 0;
   
@Override
protected void onCreate(Bundle savedInstanceState) {
super.onCreate(savedInstanceState);
setContentView(R.layout.activity_main);

button = (Button) findViewById(R.id.buttonDownload);

button.setOnClickListener(new View.OnClickListener() {
       @Override
            public void onClick(View v) {
                try {
                showDialog(typeBar);
String serverUrl = http://amishra.asite.asitehq.com:8080/exchange/doc.htm;
                new Downloader().getData(serverUrl);
                } catch (Exception e) {
e.printStackTrace();
}
            }
        });
}

@Override
public boolean onCreateOptionsMenu(Menu menu) {
getMenuInflater().inflate(R.menu.activity_main, menu);
return true;
}

@Override
    protected Dialog onCreateDialog(int id) {
        switch(id) {
        case 0: // Spinner
            progDialog = new ProgressDialog(this);
            progDialog.setProgressStyle(ProgressDialog.STYLE_SPINNER);
            progDialog.setMessage("Downloading ...");
            progDialog.setCancelable(false);
            progDialog.show();
            return progDialog;
        case 1: // Horizontal
            progDialog = new ProgressDialog(this);
            progDialog.setProgressStyle(ProgressDialog.STYLE_HORIZONTAL);
            progDialog.setMax(maxBarValue);
            progDialog.setMessage("Dollars in checking account:");
            progDialog.setCancelable(false);
            progDialog.show();
            return progDialog;
        default:
            return null;
        }
    }

private class Downloader extends AsyncTask<String, String, String> {
private String reponseData = null;

@Override
        protected void onPreExecute() {
            super.onPreExecute();
            showDialog(typeBar);
        }

protected String doInBackground(String... args) {
int TIMEOUT_MILLISEC = 2000;
int count;
HttpParams httpParams = new BasicHttpParams();
HttpConnectionParams.setConnectionTimeout(httpParams, TIMEOUT_MILLISEC);
HttpConnectionParams.setSoTimeout(httpParams, TIMEOUT_MILLISEC);

// Instantiate an HttpClient
HttpClient httpclient = new DefaultHttpClient();
HttpPost httppost = new HttpPost(args[0]);

try {
Log.i(getClass().getSimpleName(), "send  task - start");
ResponseHandler<String> responseHandler = new BasicResponseHandler();
reponseData = httpclient.execute(httppost, responseHandler);
Log.i(getClass().getSimpleName(), reponseData);
InputStream inputStream = new ByteArrayInputStream(reponseData.getBytes());

FileOutputStream output = new FileOutputStream(new File("/sdcard/sampleData.xml"));
byte data[] = new byte[1024];
                long total = 0;

                while ((count = inputStream.read(data)) != -1) {
                    total += count;
                    publishProgress("" + (int)(( total * 100) / reponseData.length()));
                    output.write(data, 0, count);
                }

                output.flush();
                output.close();
                inputStream.close();
            } catch (Throwable t) {
t.printStackTrace();
Log.e("MainActivity", "" + t.getMessage());
}
return null;
}

protected void onProgressUpdate(String... progress) {
            Log.d("ANDRO_ASYNC",progress[0]);
            progDialog.setProgress(Integer.parseInt(progress[0]));
       }

       @Override
       protected void onPostExecute(String unused) {
           dismissDialog(DIALOG_DOWNLOAD_PROGRESS);
  Toast.makeText(getApplicationContext(), "File downloaded successfully", Toast.LENGTH_LONG).show();
       }
 
  public String getData(String url) throws Exception{
try {
execute(url);
} catch (Exception e) {
throw e;
}
return reponseData;
}
}
}
-----

We have done all the required changes for application.
Below are the some screen snippets for application.


Sunday, March 17, 2013

Apche Solr in details with configuration

I were previously posted details of the Apche Solr and its configuration in J2EE.
Here is the web-link of my blog,

This might be useful to your business requirement.

Regards,
Ashish Mishra