Sunday, July 26, 2015

Apache Camel: Integration with JMS and ActiveMQ

Today, I will explain about how to work with JMS(Java Message Service) in your SOA/ESB. JMS is powerful API to exchange data between different systems now days. I am not going to in depth of JMS. I will explain just basic of it. To use JMS we require some middleware message broker which persist data for sometime. There mainly two ways of exchanging the data. 1) Point-to-Point (Queue) 2) Publish-Subscribe (Topic). You can use any of them based on your business requirement.

Point-to-Point

Publisher-Subscribers

Reference : JavaTPoint. You can read more details of JMS from given reference.

JMS Flow

Now, Let me give some basic about middleware message broker in SOA/ESB based applications. Message Broker is the tools which is placed between producer and consumer to exchange the data using formal messaging protocol. You can have clear picture by referring below images which I found on RedHat portal. There are many provider of message brokers. The notable and popular brokers are ActiveMQ and RabbitMQ. Here, I have used ActiveMQ as middleware message broker. You can read more about ActiveMQ from here.

Reference: RedHat
Now, Let's Integrate JMS and ActiveMQ using Apache Camel. We will go step by step to configure the JMS and ActiveMQ in using Apache Camel in Jboss Fuse ESB. I hope, you have already setup the all the things to build and run camel based apps in Jboss Fuse ESB.

Step 1: To add JMS and ActiveMQ maven dependency in your project.
Add below lines of code in your projects pom.xml.

<dependency>
    <groupId>org.apache.camel</groupId>
    <artifactId>camel-jms</artifactId>
    <version>x.x.x</version>
    <!-- Your camel's version -->
</dependency>

<dependency>
   <groupId>org.apache.activemq</groupId>
   <artifactId>activemq-pool</artifactId>
   <version>x.x.x</version>
   <!-- Check Apache Camel's version and find the appropriate activemq version -->
</dependency>

After adding this clean and build your project so, maven can load the dependent library in //users/.m2

Step 2: Create activemq.xml
Creates the activemq.xml in which you have to define the where to store the messages which comes to ActiveMQ. What are the broker name, what is the default directory for storage, what will be the persistence adapter for storage, memory usage etc. Place this file in the server classpath or conf directory from where the server looks up config related things.

For Jboss Fuse ESB, you should place this activemq.xml in etc folder of your server. Please verify that this is added in the config file with name activemq-karaf-{activemq-karaf-version}.redhat-{fuse-version}-activemq.cfg. In this file you can find the ActiveMQ related configuration like as per below and this file reside in
\\server-base-dir\system\org\apache\activemq\activemq-karaf\{activemq-karaf-version}.redhat-{fuse-version}

broker-name=amq-broker
data=${karaf.data}/${broker-name}
config=${karaf.base}/etc/activemq.xml

Now, let's add the beans related to ActiveMQ and routes which produce and consume the message to from ActiveMQ message broker. I will also show how to send/receive to/from queue and topic.

Below are the beans which manage the transactions to exchange the messages between camel and ActiveMQ,

        <bean id="activeMQConFactory" class="org.apache.activemq.ActiveMQConnectionFactory">
<property name="brokerURL" value="tcp://localhost:61616" />
<property name="userName" value="userName_activemq"></property>
<property name="password" value="password_activemq"></property>
</bean>

<bean id="pooledConFactory" class="org.apache.activemq.pool.PooledConnectionFactory"
init-method="start" destroy-method="stop">
<property name="maxConnections" value="5" />
<property name="connectionFactory" ref="activeMQConFactory" />
</bean>

<bean id="jmsConfig" class="org.apache.camel.component.jms.JmsConfiguration">
<property name="connectionFactory" ref="pooledConFactory" />
<property name="concurrentConsumers" value="5" />
</bean>

<bean id="activemq" class="org.apache.activemq.camel.component.ActiveMQComponent">
<property name="configuration" ref="jmsConfig" />
</bean>

JMS Queue: Produce and consume messages using JMS Queue. Add below routes in your camel context file.

<!-- Route which sends message to the jms-queue with name test-queue -->

<camel:route id="MessageSenderToJMSQueue">
<camel:from uri="direct:SomeTestRoute" />

<camel:log logName="MessageSenderToJMSQueue" loggingLevel="INFO"
message="Entered in MessageSenderToJMSQueue : ${body}" />

<camel:removeHeaders pattern="*" />

<camel:to uri="activemq:queue:test-queue" />
</camel:route>

<!-- Route which receive message from the test-queue with name queue-name -->

<camel:route id="MessageReceiverFromJMSQueue">
<camel:from uri="activemq:queue:test-queue" />

<camel:log logName="MessageReceiverFromJMSQueue" loggingLevel="INFO"
message="Entered in MessageReceiverFromJMSQueue : ${body}" />

<camel:to uri="direct:SomeTestRoute" />
</camel:route>

JMS Topic: Produce and consume messages using JMS Topic. Add below routes in your camel context file.

<!-- Route which sends message to the jms-topic with name test-topic -->

<camel:route id="MessageSenderToJMSTopic">
<camel:from uri="direct:SomeTestRoute" />

<camel:log logName="MessageSenderToJMSTopic" loggingLevel="INFO"
message="Entered in MessageSenderToJMSTopic : ${body}" />

<camel:removeHeaders pattern="*" />

<camel:to uri="activemq:queue:test-topic" />
</camel:route>

<!-- Route which receive message from the jms-topic with name test-topic -->

<camel:route id="MessageReceiverFromJMSTopic">
<camel:from uri="activemq:topic:test-topic" />

<camel:log logName="MessageReceiverFromJMSTopic" loggingLevel="INFO"
message="Entered in MessageReceiverFromJMSTopic : ${body}" />

<camel:to uri="direct:SomeTestRoute" />
</camel:route>

That's it. Now, build your application and run on Fuse Server. Your apps is ready to produce and consume messages from ActiveMQ using JMS API.

I hope you have enjoyed this camel riding. Please don't forget to give your feedback and suggestion to improve this article and of course my blog writing.

Thanks a lot for your time to read this blog.

Saturday, July 25, 2015

EIP : Enterprise Integration Patterns


EIP Differentiated based on its works.

Reference : EIP

Apache Camel: Splitter Component And Aggregation EIP

Today, I'm going to explain about the Camel's Splitter component. I will also explain how and when to use this component. Here, I used Spring DSL to configure the splitter. So, let's start the camel riding.

The splitter component is based on Splitter EIP which allows you to split your incoming message into no. of smaller pieces and process them independently. It's considered as parallel processing of bulk messages which comes as a single bundled. The splitted message will be set as a body of message in newly created exchange which contains all the headers, properties of parent exchange. This component supports various data types including xml, json, csv, etc. This is about when to use this component.

There are various options available for this component which you can configure in spring dsl by setting respective attributes along with its value to make it more powerful route. Along with Splitter component I will also explain about the Aggregation EIP. The aggregation EIP is used to collect output from parallelly processed splitted messages. I think this is sufficient explanation for Splitter component. You can read from official Apache Camel website.


Now, Let's start the programming. I assume that you have created your project by using Maven.

<!-- Incoming XML -->
<Orders>
<Order>
<Header>...</Header>
<LineItems>
<LineItem>...</LineItem>
</LineItems>
<Footer>...</Footer>
</Order>
.
.
.
<Order>
<Header>...</Header>
<LineItems>
<LineItem>...</LineItem>
</LineItems>
<Footer>...</Footer>
</Order>
</Orders>

Now, Sping DSL for Splitter Copmonent,

<!-- This bean is used to collect the output from the splitted messages from splitter component -->
<bean id="aggregationBean" class="com.makhir.beans.AggregationStrategyBean" />

<camel:route id="SplitterExampleRoute">
<camel:from uri="direct:SplitterExampleRoute" />

<camel:log logName="SplitterExampleRoute" loggingLevel="INFO"
message="Entered in Splitter Component : ${body}" />

<camel:split strategyRef="aggregationBean" stopOnException="false">
<camel:xpath>//Orders/Order</camel:xpath>
<camel:to uri="direct:SplittedMessageProcessingRoute" />
</camel:split>

</camel:route>

<camel:route id="SplittedMessageProcessingRoute">
<camel:from uri="direct:SplittedMessageProcessingRoute" />

<camel:log logName="SplittedMessageProcessingRoute" loggingLevel="INFO"
message="Entered in SplittedMessageProcessingRoute : ${body}" />
<!--
Add your business logic for validation, transformation, etc.
-->
<camel:to uri="direct:some-route"/>
</camel:route>

Now, I'm writing the aggregation class which is as per below,

package com.makhir.beans;

import org.apache.camel.Exchange;
import org.apache.camel.processor.aggregate.AggregationStrategy;
import org.slf4j.Logger;
import org.slf4j.LoggerFactory;


public class AggregationStrategyBean implements AggregationStrategy {

private static Logger logger = LoggerFactory.getLogger(AggregationStrategyBean.class);

@Override
public Exchange aggregate(Exchange oldExchange, Exchange newExchange) {

try {
if (oldExchange == null || oldExchange.getIn() == null
|| oldExchange.getIn().getBody() == null
|| oldExchange.getIn().getBody(String.class) == null) {
checkAndProcessExchange(newExchange);
return newExchange;
} else if (newExchange == null || newExchange.getIn() == null
|| newExchange.getIn().getBody() == null
|| newExchange.getIn().getBody(String.class) == null) {
return oldExchange;
}
//Add your business logic for capturing the information from the splitted message(newExchange)
//and set it into parent message(oldExchange)

} catch (Exception e) {
logger.error("There was a problem while aggregating the data, error message " + e.getMessage());
}
return oldExchange;
}
}

That's it. You can try this by adding above routes in your camel context as per your requirement.

I hope you have enjoyed this camel ride.

Reference: Apache Camel

Monday, June 22, 2015

Apache Camel: Jetty Component

Today, I'm going to explain about the Camel's Jetty component and how to configure to the jetty component. Here, I used Spring DSL to configure the jetty component. So, let's start the camel riding.

Camel's jetty component is used for HTTP/S based request/response as like classical Servlet. Jetty component consumes and produces the http request/response and support GET, POST, DELTE, PUT methods of forms. It act as a servlet as we define J2EE web  project. It receive the request from the client, process it and create the response accordingly. With Jetty component we can create the HTTP based endpoints which consumes/produces http request.

Now, Let's start the programming. I assume that you have created your project by using Maven. I also assume that you have added all the dependency required for camel in your project.

Add the below dependency in your project's pom.xml

<dependency>
    <groupId>org.apache.camel</groupId>
    <artifactId>camel-jetty</artifactId>
    <version>X.X.X</version> <!-- Here, the version must be same as your project's camel version -->
</dependency>
After adding jetty dependency please do clean and build your project.

Now, I'm going to add the endpoints which receive the incoming request and respond it accordingly. Below is the configuration based on Spring DSL.

The  Spring-DSL for camel-jetty component,

<!-- Jetty Component -->
<camel:route id="httpComponent" startupOrder="1">
<camel:from uri="jetty:http://URL:PORT/makhir?continuationTimeout=100000" />
<camel:setExchangePattern pattern="InOut" />
<camel:convertBodyTo type="java.lang.String" charset="UTF-8"/>
<camel:to uri="log:Recived Input in httpComponent?showAll=true" />
<camel:choice>
<camel:when>
<camel:simple>${header.CamelHttpMethod} == "GET"</camel:simple>
<camel:to uri="direct:testGetRoute" />
</camel:when>
<camel:when>
<camel:simple>${header.CamelHttpMethod} == "POST"</camel:simple>
<camel:to uri="direct:splitterRoute" />
</camel:when>
</camel:choice>
</camel:route>

We can have same component using Java DSL also. I've created the jetty component which receives the incoming http request and serve accordingly as per below.


/**
 * This is the jetty component which creates the http endpoint which
 * consumes the http request and respond accordingly.
 * @author Ashish Mishra
 * @since 22-06-2015 15:02:05
 * */
public class JettyCommponent extends RouteBuilder{
@Override
public void configure() throws Exception {
from("jetty:http://localhost:8080/makhir?continuationTimeout=100000").process(
new Processor() {
@Override
public void process(Exchange exchange) throws Exception {
String message = exchange.getIn().getBody(String.class);
System.out.println("Request Body Message : " + message);
String httpMethod = (String) exchange.getProperty("CamelHttpMethod");
System.out.println("Http Method : " + httpMethod);
if(httpMethod.equalsIgnoreCase("GET")){
System.out.println("Add implementation for GET method and route accordingly");
} else if(httpMethod.equalsIgnoreCase("POST")){
System.out.println("Add implementation for POST method and route accordingly");
} else
System.out.println("Default Implementation " + message);
exchange.getOut().setBody("Response: " + message);
}
});
}
}

Now, you should add this routes in your main class which have CamelContext object. About how to add the routes in camelcontext I've explained in my first blog related to camel.

That's it. Now build your project and deployed it in your ESB and try to call that endpoint by creating some java test class using http client.

You can use the Jetty component as per your need in your application. It gives web servlet like features in camel routing.

You can read more about camel:jetty component Apache Camel.

Hope, you have enjoyed this camel ride.

Wednesday, April 15, 2015

Apche Camel : First Step Towards

Here, I'm going to explain basic things of Apache Camel which is an open source project from Apache Foundation. At the end we will see the simple example which demonstrate the FileComponent of Apche Camel.

To go further I assumed that you have enough knowledge of EIP(Enterprise Integration Patterns), MEP(Message Exchange Patterns), DSL(Domain Specific  Languages), ESB, etc. It is advised to have basic information of above mentioned terms before you read further.

Now a days data becoming crucial things in the Cyber World among all the companies. To exchange the data between them is more crucial as each company has their own system to handle this data. It is important to have technology which fills this gap in such a way that exchange of data among companies accurately, efficiently, speedily, reliably, securely and off course easily. There are many open source solutions available to fill this gap. But I found Apache Camel is most preferable open source solution for integrating different systems to exchange the data in a different format. I became a camel lover since when I started using it and off-course because it is written in Java.

Now, I think this is enough for you about why Apache Camel is useful. Let's start with the Apache Camel architecture.


Now let's see the key concept or components which make Apache Camel a powerful integration and routing framework among all the available in the same category.
  • Camel Context: Camel Context is the heart of the Camel Framework. It's runtime environment where different entity communicate with each other. For more you can see the lifecyle of CamelContext in detail
  • Camel Endpoints: Camel Endpoints are nothing but the Message Endpoints which is based on EIP by using Endpoint interface. Camle can receive messages from Endpoints or send messages to the Endpoints. You can read more on EIP by visiting this http://www.enterpriseintegrationpatterns.com
  • Camel Processors: Processors are the again key entity in camel which is associated with processing of incoming messages from Endpoints. For more you can visit http://camel.apache.org/processor.html
  • Camel Components: Camel Components defined the Endpoint in message lifecyle in camel. There are more than 80 components available in the camel. You can refer them on official camel website. http://camel.apache.org/components.html
  • Camel Route: Camel Route are the flow of the message. How it process in camel. It has two endpoints associated with it and respectively Camel component as well. Camel route also having the filter, interceptor, validator, converter which defined the flow of the message. We can create a route via DSL. There are different DSL available which defined the route of the message. Most commonly used are Spring DSL, Java DSL. You can read more on that by your own as it's a very huge topic and we are not going elaborate them over here.

Now, I'm winding up theoretical part as you can read whenever you want from the net. I knew that you are quite interested in the programming. :D :D :D

So, Let's begin that. First you need to download the Apache Camel from the official site. You can download form here.

I will be surprised if you don't have java installed on your machine and you are not using any of the popular IDE for doing programming. If you do not have java than please make java available on your machine.

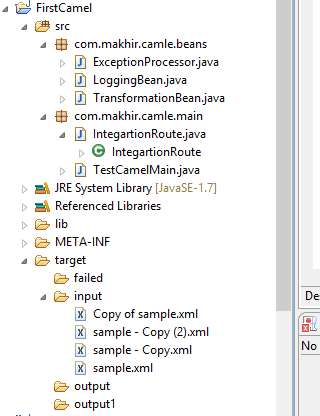
Now, create on java project. Here, I've used Eclipse IDE for my stuffs. Below is the directory structure.


Add the required jar in the lib folder of your project from the downloaded Apache Camel zip file after extraction on you local drive. Add then into classpath too of your project.

As you can see that I've created two two package in my project. One for having all the beans and one having launcher class and route builder class. I've also created one folder with name target in the same project and respectively added there more folder with name input, output, failed folder.

Here, I've used FileComponent of the Camel for file processing. I've created one class with name TestCamelMain.java which act as a launcher of the Camel. Below is the code snippet of the same class.

TestCamelMain.java
------------------------------
public class TestCamelMain {
public static void main(String[] args) {
System.out.println("Enter: TestCamelMain.main");
CamelContext context = null;
try {
context = new DefaultCamelContext();
context.addRoutes(new IntegartionRoute());
context.start();
//Indefinitely wait
Object obj = new Object();
synchronized (obj) {
obj.wait();
}
//Thread.sleep(10000);
} catch (Exception e) {
System.out.println("Error: " + e.getMessage());
e.printStackTrace();
try {
context.stop();
} catch (Exception e1) {
e1.printStackTrace();
}
}
System.out.println("Exit: TestCamelMain.main");
}
}
-----------------------
Now we are going to create the route builder class which defined the flow of the incoming message. Here, I've created the class with name IntegartionRoute.java which extends RouteBuilder class. The code snippet as per below,

IntegartionRoute.java
------------------------
public class IntegartionRoute extends RouteBuilder{

@Override
public void configure() throws Exception {
System.out.println("Enter: IntegartionRoute.configure");
/**
* If we wanted to handle the any kind of exception occurred during the processing
* than we have to add the exception block first. This will capture the exception route the
* message to specified endpoint
* */
onException(Exception.class)
.maximumRedeliveries(0)
.process(new ExceptionProcessor())
.to("file:target/failed");
from("file:target/input")
.choice() //Here we can give the choice to the incoming document
.when(xpath("/order/product = 'gadget'"))
.process(new LoggingBean())
.bean(new TransformationBean(), "makeItUpperCase")
.to("file:target/output")
.otherwise()
.to("file:target/output1");
System.out.println("Exit: IntegartionRoute.configure");
}
}
------------------------------
In the above class I've defined the route of my incoming message. As I've stated that I've used FileComponent for receiving the file from target/input folder and after processing move to target/output folder by checking file content and by making file content to upercase.

Here, I've also handled the exception whenever occurred during the file processing in different component. In this case I've added one business logic to check the the file content whether it content contains the specific information or not by using xPath which is again Camel's component. If it do not contains the required information than we will send that file to target/output1 directory. If it contains than we will send it to the target/output directory. In between any error occurred than we will send that file to target/failed directory. Here, I've used Java DSL for defining the route.

I've considered the incoming file to be xml file. Below are the ExceptionProcessor,  LoggingBean, TransformationBean which are used at different stages.

ExceptionProcessor.java
------------------------------
public class ExceptionProcessor implements Processor{

@Override
public void process(Exchange exchange) throws Exception {
System.out.println("Enter: ExceptionProcessor.process");
Exception exception = (Exception) exchange.getProperty(Exchange.EXCEPTION_CAUGHT);
System.out.println("Error: " + exception.getMessage());
exception.printStackTrace();
System.out.println("Exit: ExceptionProcessor.process");
}
}
------------------------
LoggingBean.java
------------------------
public class LoggingBean implements Processor{

@Override
public void process(Exchange exchange) throws Exception {
System.out.println("Enter: LoggingBean.process");
System.out.println("Received Message Id: " + exchange.getIn().getMessageId());
System.out.println("Captured Data: " + exchange.getIn().getBody(String.class));
System.out.println("Exit: LoggingBean.process");
}
}
----------------------------
TransformationBean.java
----------------------------
public class TransformationBean {
public String makeItUpperCase(String body) {
System.out.println("Enter: TransformationBean.makeItUpperCase");
String transformedBody = body.toUpperCase();
System.out.println("TransformedBody : " + transformedBody);
System.out.println("Exit: TransformationBean.makeItUpperCase");
return transformedBody;

}
}
---------------------
Below are the xml file which I've used in processing,
---------------
sample.xml
---------------
<xml version="1.0" encoding="UTF-8"> 
 <order>
 <product>gadget</product>
 <lineitems>
  <item>cdplayer</item>
  <qty>2</qty>
 </lineitems>
 <lineitems>
  <item>ipod-nano</item>
  <qty>1</qty>
 </lineitems>
</order>

Congrats to you. You have learnt first lesson of Apache Camel.
Now by running TestCamelMain.class you can see the Camel is started. Now, for a magic you should  put one file in target/input folder and check the respective folder and also see the console for the flow.

That's it. After reading this don't forgot to give your valuable feedback on the same. Your feedback might be useful to other and also encourage me to keep posting.

Will come soon with other topic of Apache Camel.

(Reference: Apache Camel and DZone)

Cheers,
Ashish Mishra